Something that may not be obvious when you first start using Bryce is that the interface can be customised to a degree. It doesn't have the functionality to let you divide up the window space like some other apps but you can make some minor changes to the way the interface looks. I'm using Bryce 7 in the making of the tutorials below, but the same steps apply to previous versions.
CHANGING THE DISPLAY MODE
This can be done from the Advanced Display Palette located on the right
of the interface as shown below (shown where I've highlighted the
Display and Wireframe modes in the tutorial
The Interface )
Select the icon that looks like a wireframe cube (fourth icon from the bottom), and a list of the modes will appear.
The default is always 'Default Wireframe' as shown in the above
image. Other options though can be very useful in setting up scenes.
There are two types of mode:
Default Mode
Default Wireframe
Default Mixed
Default Rendered
Open GL Mode
Texture Shaded
Lit Wireframe
Wireframe
Hidden Line
Wire Shaded
Smooth Shaded
Wire Texture Shaded
Sometimes
Bryce takes a little longer to respond when using OpenGL, but this is much improved in Bryce 7 compared to Bryce 6.
You can also just scroll through the modes by clicking the display modes icon repeatedly instead of opening the list. Bryce will scroll throgh the modes in the mode category, i.e. if you select one of the default modes it will scroll through those, or if you select a Open GL mode it will scroll through those options.
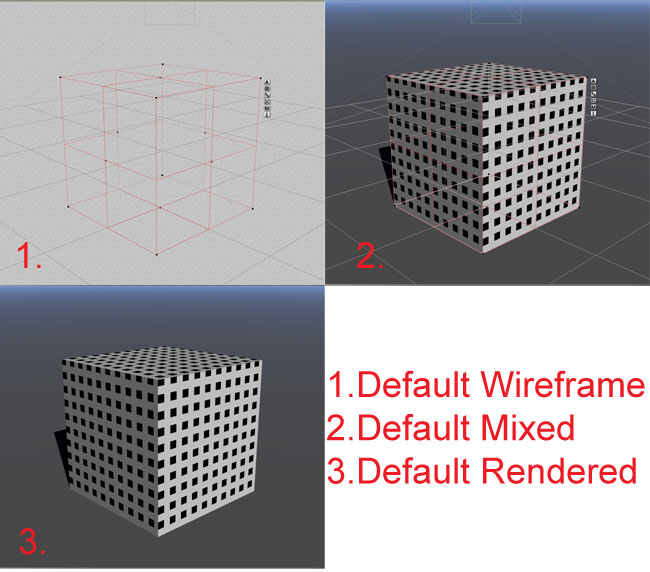
The image below shows the various default mode options with a brief explanation of each below that::
1.
Default Wireframe - a simple wireframe display
2
.Default Mixed - if you have rendered to screen this will show the last render in addition to a wireframe, otherwise the display is similar to the Open GL Wireframe mode. If you move your object in the scene the object remains and moves as a wireframe object, but the rendered image remains on the screen behind this.
3
.Default Rendered - shows you the last render to screen. As soon as you move/edit an object in the scene it will revert back to the default wireframe view
The following images show the OpenGL modes with brief explanations again after:
1.
Texture Shaded - shows objects as solid with textures and shadows.
2.
Wireframe - shows objects as a simple wireframe
3.
Lit Wireframe - shows objects as wireframe with light and shadows (not clearly seen I'm afraid in my example image, please click the image for a larger view)
4.
Hidden Line - shows only those parts of the object visible by the camera.
5.
Wire Shaded - shows the object as solid with a wireframe.
6.
Smooth Shaded - shows the object as solids with light and shadow. This looks similar to 5. but ifyou look at the ground plane (click the image to enloarge it) you will not see any wireframe.
7.
Wire Texture Shaded - shows the object with textures, shadows and wireframe.
CHANGING THE BACKGROUND APPEARANCE
This is also changed from the Advanced Display Palette. The effects only really work if you are in the'Default Wireframe Mode' as in my screenshots (see the tutorial above for the various modes).
If you hover your mouse over the fourth icon down you'll see it says Background Paper in the tooltip and the text display area. It looks like paper with a corner turned up.
If you click on the icon a list of the various background appearance options appears:
As you can see I have my background set to 'Paper' which I have used for all the tutorials on this site (click the image above to get a larger view) . Try out some of the options - you can even change the colour completely by selecting 'Select Color' from the list. Here's how some of the options look:
So go ahead and customise your background!:)
REPOSITIONING THE PALETTES
Did you know that the various palettes of the interface can be moved around? It's not a totally customizable interface like many other apps are but the option is there to move them around.In the image below I've coloured the regions that can be moved (each of the 3 palettes in the green region can be moved separately).
So here's what you do:
1. Hover your mouse over the palette you want to move and hold down your keyboard spacebar. A hand icon will appear in place of your mouse icon.
2 .Keep holding the spacebar down, left-click your mouse and drag the palette to where you want it.
In this way you could for example move the Edit palette away from the top palette as shown below:
Moving the palette only seems to be useful when using the Default Display modes, as if you use one of the OpenGL ones and go to edit your scene, the palette seems to disappear behind it. The next image show how I've moved nearly all the palettes to new positions. It seems to work best with the document setup reduced from the maximum recommended sized (File>Document Setup), as shown in my image. I think it would probably work better too on larger monitors, mine is only small.
But still, it does give you the possibility to customize the interface a bit, if you find a layout that works better for you.
TUTORIAL LIST