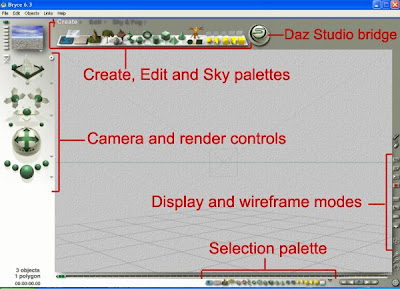
So, when you open Bryce this is what you will see on your screen:
You have a nice large viewport which at the moment only contains the default ground plane and default sun and sky settings. The File menu is at the top left (File, Edit, Objects, Links, Help) and there are various controls on all sides of the viewport. We're going to take an look at these in these tutorials. The ones you need to focus on to get started are the camera and render controls, and the edit, create and sky palettes.

- On the interface you will see a number of little triangles, either pointing down or to the right. Clicking on this brings up further options or libraries relating to the control it is next to.
- To select objects and controls in Bryce click your left mouse button. Some controls require you to continue to hold down the button as you move the mouse to activate the control or make a further selection. We'll come across this in the tutorials as we go along.
Next tutorial - The Camera and Render controls
TUTORIAL LIST


as a newbie/silversurfer, i find the tutorials helpful i would say to anyone new to bryce not to try and run before you can walk ,i know i have tried it and it dont work
ReplyDeletekeep up the good work.
thank you for the tutorial... I prefer this style of tutorial to the videos because you can stop and flip back and forth. Well done, and I appreciate your work.
ReplyDelete