Hopefully you've become comfortable with using Bryce objects and giving them materials via the Create and Edit palettes. So you may have an object in your scene, and ground with a material of your choice from the materials library. But what about the sky? Maybe you want a moody, brooding atmosphere, night scene or just a different coloured sky. In Bryce you can not only change the sky colour and sun colour/size but there are settings for clouds, haze, stars and more.
It's not too difficult to change some of the basic sky settings but Bryce also comes with a good range of Sky & Fog presets, i.e ready made sky settings. So as using presets is the simplest way to get started lets take a look at those in this part of the tutorial.
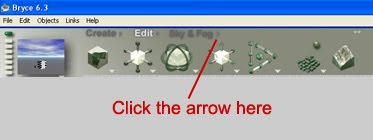
1. Click the little arrow/triangle next to the words Sky & Fog. Note: it doesn't matter if the Create or Edit palette is highlighted, and you don't have to click on the actual words Sky & Fog.

The sky and fog library will appear as shown in the image below.As with the object material library we have various categories at the bottom right which can be accessed by the small triangle next to the work 'Installed'. The default choice is 'Installed'.
Within this category we can see above that there are various sub-categories e.g Daytime, Nightime, Fantasy-SciFi.
3. Select a preset sky - just click on one of the images, it will be bounded in red when you do.The preview will show your selection and the name of the preset will appear.
I've chosen 'Simple Perfection' from the Daytime sub-category (3rd row down, 2nd one along):
You may notice that the Nano preview does not show the sky we've selected yet - it will when we complete the next step:
4. Click the tick at the bottom left of sky preset window - (circled in step 3 above). This activates your preset and exits the library.
5. Render your scene - click on the big green round Render button on the left of the interface:
If you don't like the preset press Ctrl+Z on your keyboard or just go back into the library and choose a different preset.
Now my image isn't very interesting as I've just used a basic cube and default ground for illustration purposes, but I'm sure you can be more creative introducing various objects from the object library, terrains, trees etc. If you have Daz Studio, which is free from DAZ 3D, you can import ready textured models directly from Daz Studio into Bryce...very useful!! Take a look at my tutorial Using Daz Studio with Bryce.
There are other ways to have more control over how the sky looks, even the preset skies: if you are ready to be more adventurous see part two: The Sky and Fog palette - part 2
TUTORIAL LIST


I really have to thank you for this blog! I didn't even know it existed! As my name says I am a 3D Beginner and currently have the free version of Bryce 5 and I could use all the help that I can get!
ReplyDeleteI'm very new too... but this blog is really helping me along. It's cool that Bryce Basic's (I don't know what else to call him) has gone through the time and effort to help people like us. Hope you are having a blast with it, 3D.
ReplyDelete~elvensong