PART 1
PART 2 (coming soon)
DEFINITION
To render your computer scene in Bryce or any other 3d application means to turn the 3d scene into an image - a view of a 3D model that has been converted into an image to a format for display or printing. So any scene I make in Bryce I can have converted to a suitable file format such as .TIFF which I can then print out or postwork in Photoshop or any other paint program.
We can render within Bryce or to a file on our computer to print or postwork later. Let's see how:
RENDERING IN BRYCE
We render within Bryce to see how our composed scene or model will look when we render it to disk finally. It's a good check to see how the work is looking. If you have done the tutorial The Edit Palette you will have tried this already. But let's start from the beginning again.
These are the render controls you see on the Bryce interface:
We'll look at the different buttons in part 2, but for now lets show you how to a basic render to screen so you can see how those scenes you've started making are coming along. We only need to use the big green button labelled 3 in the image above.
1. Arrange some models or objects in the Bryce viewport. - (see the tutorial on The Create Palette for how to get simple Bryce objects into your scene)
2. Click the big green Render button - (3 in the image above) Rendering will start and the button will turn blue. You will see a horizontal black line start to progress down the screen and what you will see in the viewport will appear more as a realistic image than the wireframe view.
Simple huh?:)
But I don't just want my wildly creative image to just sit on my computer screen. We need to render to disk to create an image file we can upload to a gallery or print off as art. Again, this is simple:
1. Create your scene in Bryce and make sure you are happy with the arrangement and camera view - (and don't forget to save it!!).
2. Check you are really happy with it by rendering to screen first.
3. Select 'Render to Disk' - Click on the File menu at the top left of the screen, and holding your mouse down drag it down till 'Render to Disk' is highlighted.
4. Confirm the image resolution and pixel dimensions you want - you can stick to the default whilst you are learning.
1 - This is the name of your Bryce scene file open that you are going to render.
2 - You can change the finished rendered image size in pixels here.
3 - If you plan on printing your images you will need to increase the print resolution here. 72 or 92 dpi is fine for images you want to only upload to the web. For more on pixels and print resolution try these tutorials: http://www.photoshopessentials.com/essentials/image-quality/
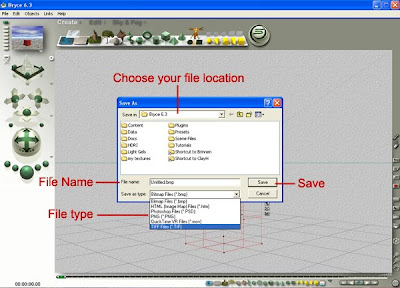
5. Save to a file on your computer

File name - this field will automatically be set as your Bryce scene file name, but you can change it to whatever name you want.
File type - you have a choice. If you are starting out I would recommend selecting .TIFF to get a lossless file which you can later convert to .JPEG in your paint program if you want. For further information on file types try this really good beginners tutorial: http://graphicssoft.about.com/od/graphicformats/f/summary.htm
File location - choose the folder on your computer you wish to save the rendered image to.
Once you've hit Save Bryce will begin rendering your scene as whichever file type you selected to the location you selected on your computer. A status window will appear showing you the progress of the render as a numerical percentage and also a bar. If at any time you wish to stop the render just click the 'X' bottom right on the window:
6. Admire your artwork!
Once the render has finished you can open your image in your paint program such as Photoshop and make adjustments or any type of postwork to the image. If you are uploading galleries you will need to convert it to a .JPEG rather than .TIFFfile image as the file size is much smaller. If file sizes and types are all new to you I recommend the tutorial suggested in step 6 above.


No comments:
Post a Comment