SKY LAB
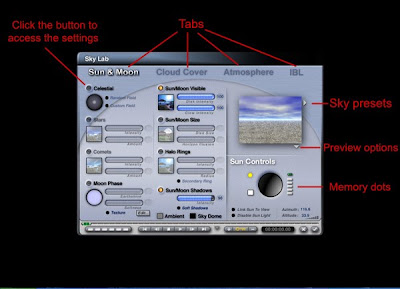
You can access the Sky lab by clicking on 'Sky & Fog' and then the little cloud icon to the right of that.
In the Sky Lab there are four tabs you can access at the top of the lab window:
Sun & Moon
Cloud Cover
Atmosphere
IBL (Image based lighting)

- On the right of the window is a preview, some sun controls and memory dots. On the left are the various settings for that tab category. Each tab window is laid out in the same way.
- To access the settings if they are greyed out, click the round button next to the setting name.
- To adjust the settings click on the value fields and type in a new value or click on and drag the slider.
- Use the memory dots to save your settings or revert back to previous settings stored in them. Just click on one of the white empty dots to save your current settings.
- Click on the triangles next to the preview in each lab for options for how your scene is viewed in that preview (mine is set to Render in scene in the above image) or access to the Sky presets.
MATERIALS LAB

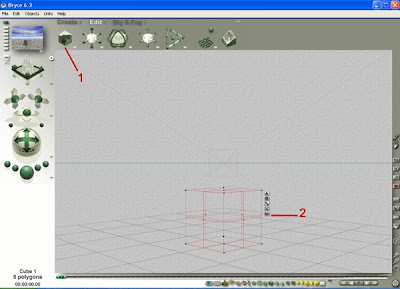
To enter the materials lab either select the Edit palete and click the square icon I've labelled 1,or click on the M, labelled 2, that appears with each objcet. When you do a window like this will appear:
In the lab you can select preview options, choose a material from the material library and make adjustment to that material, or create your own materials in the Deep Texture Editor (DTE).
1. Texture transformation tools - scale rotate or offset the texture on the object.
2. Texture source editor - accesses the DTE to customize textures from the texture library.
3. Texture library
4. Procedural texture - clicking this switches to a procedural texture if an image based one is currently set.
5. Image texture - click on this followed by the texture source editor button (2) to access a window where you can load and save your own images to use as textures.
6. Texture mapping mode - you can change the way the texture is mapped onto the object.
TERRAIN LAB
The terrain lab allows you to make changes to the appearance of the terrain.
To access the terrain lab either select the Edit palete and click the square icon I've labelled 1, or click on the 'E', labelled 2, which appears next to your terrain:
When you do so the following window will appear with four setting category windows:
Brush controls
Terrain canvas
Preview window
Editing tools
The brush is used to create terrains or customize preset ones by painting on the terrain canvas.
There is also an otpion under the 'Pictures' tab to load your own pictures to use to create terrains.
TIP - You can position each setting window , for example the terrain canvas, where you want on the screen. Just click on the top grey bar of the individual window, near where the setting title is and drag it to where you want it.
LIGHT LAB
To access the light lab click on the 'E' that appears next to the light in your scene (in the same way we clicked E to access the terrain lab above). The following window will appear:
From here you can make various adjustments to how your light looks such as the shadows it casts, colour of the light, intensity and more. As in the other labs preview options (click the triangle under the preview window) and memory dots are available.
TIPS
- To delete a saved setting in the memory dots (green) hold down Alt and click on the dot. It will revert to white
There are many more things you can do, cutomize the interface, move the palettes around, too many to mention. I hope the tutorials have helped you get around Bryce enough with confidence to explore all the other options.
TUTORIAL LIST
TUTORIAL LIST


No comments:
Post a Comment